Part 2: Implementing Our Chatbot
<< Build Your Own ChatGPT Main Page
| < Back to Part 1: Understanding GPT-3 | Next to Part 3: Critiquing Our Design > |
Table of Contents
- Table of Contents
- Code Snippets
- Program at a Glance
- Environment Assumptions
- Backend: Defining Data Flow with Python
- Frontend: Building Visuals with HTML, CSS, and JavaScript
Code Snippets
index()
chat()
generate_prompt()
get_bot_response()
index.html
getResponse()
Program at a Glance
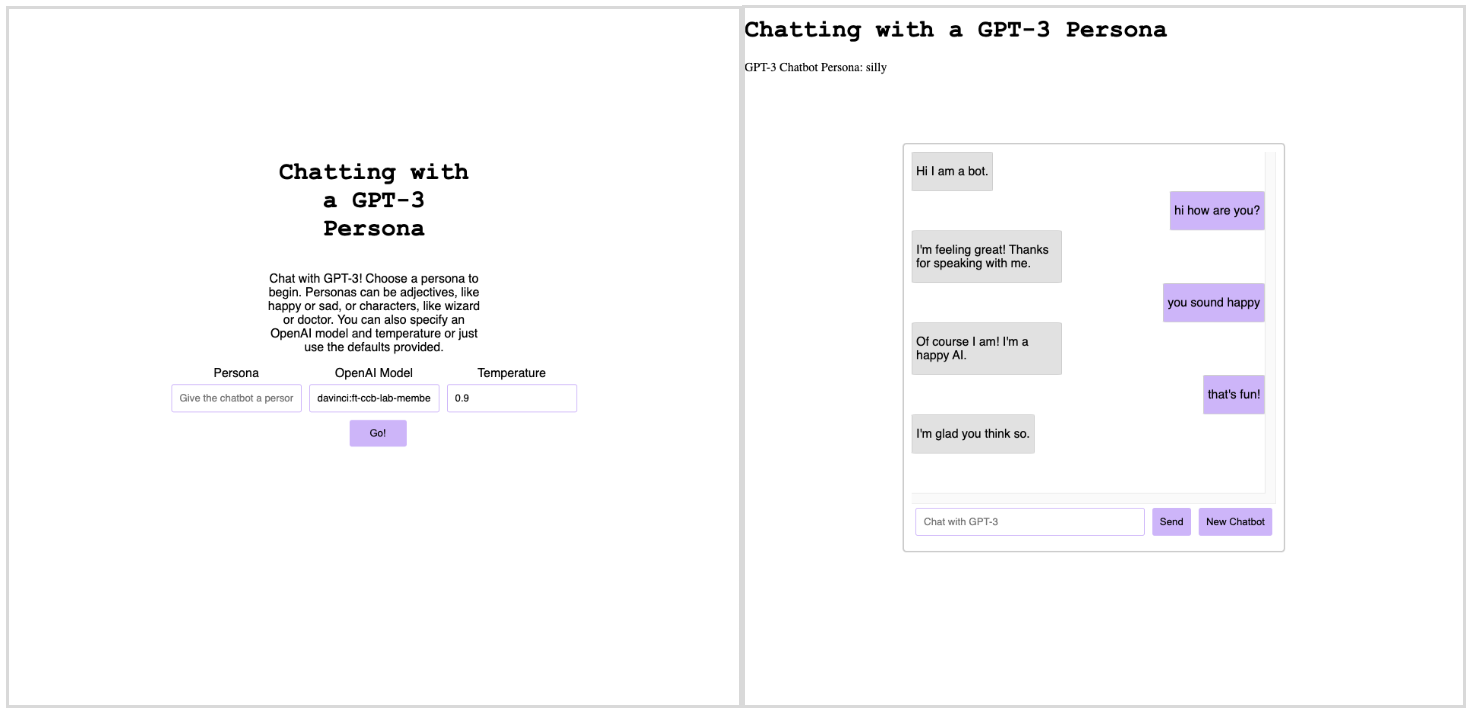
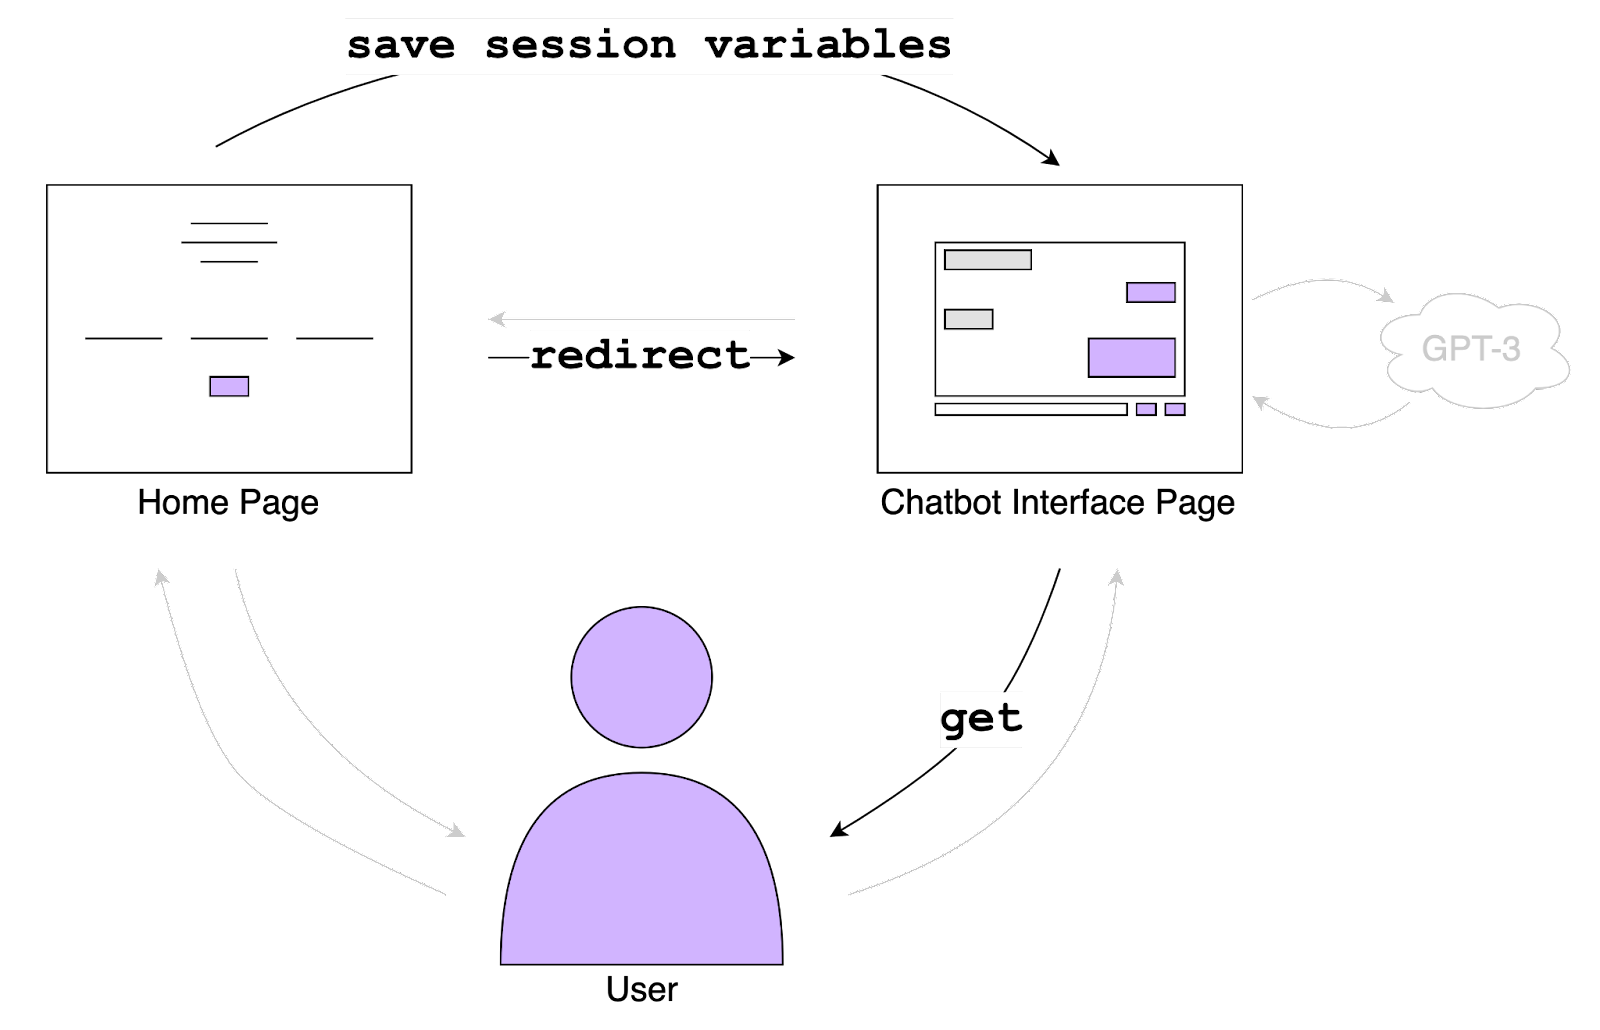
Our chatbot is a web app with two pages: the home page and the chatbot interface page. When the user first loads the chatbot, they will be asked for the persona, OpenAI model, and temperature they want to use on the home page. After clicking the “Go!” button, they will be redirected to the chatbot interface page, where they can chat with their GPT-3 persona. Under the hood, we will be prompting the selected OpenAI model with the personal through the API. On the screen, the user will see their messages as chat bubbles, similar to modern text messaging platforms. They can even start over by clicking the “New Chatbot” button. After setting up our programming environment, we will walk through how to set up the backend and then build a visual interface on top of it.
Environment Assumptions
For this tutorial, you will need to have Python 3, Flask, and the OpenAI API installed on your computer, as well as a general-purpose IDE or text editor to write code in. You will also need an OpenAI account and credits to pay for running inference on or fine-tuning a model. You should store your OpenAI API key in a file called .env. Similar to the included .env_example. Fine-tuning Curie for this tutorial cost about $40.
Backend: Defining Data Flow with Python
You can think of the “backend” as defining the flow of data throughout the web app: how does information get from one place to another? How does the user travel from one endpoint to another as they interact with the chatbot? In software engineering, an endpoint is like a virtual location that can receive HTTP requests and send HTTP responses. Our chatbot is actually a web application with two web pages as user-facing endpoints: the “home page” and the “chatbot interface page.”
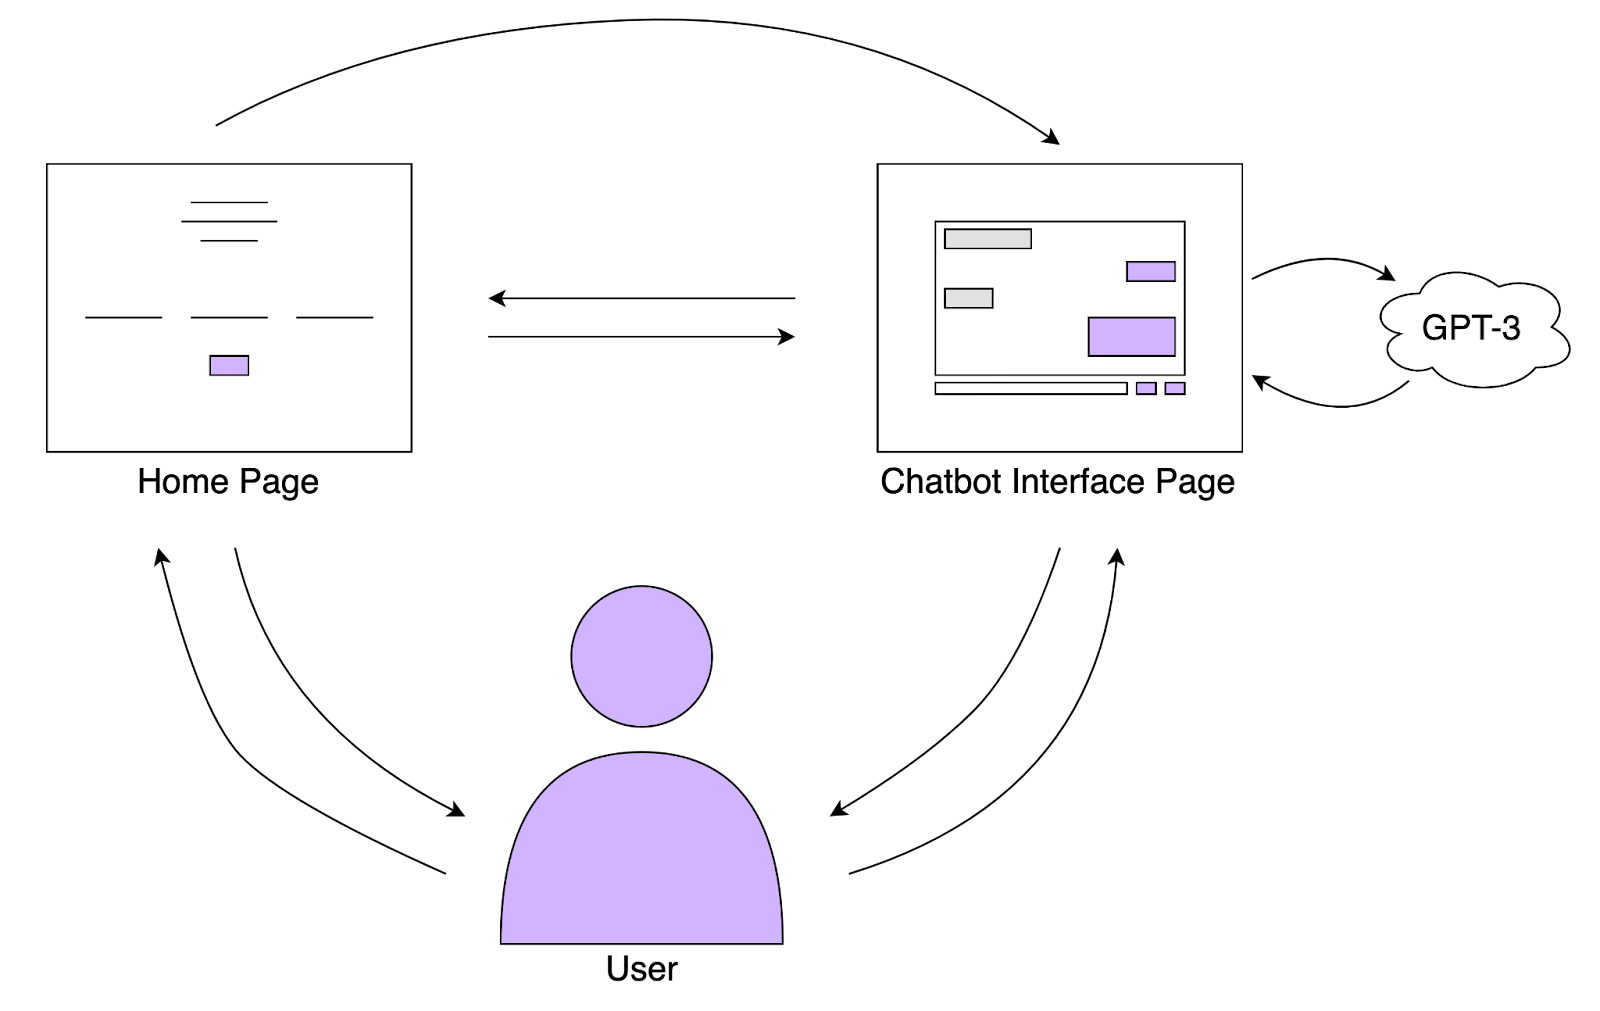
In this section of the tutorial, you can think of our web app as a small town: endpoints are destinations within the town and we need to use Python to pave virtual paths between them. In the figures throughout this section, the arrows represent a simplified view of the flow of information between endpoints as we need to understand it to build the app—technically, a web server is in the middle coordinating everything. Later, we will discuss how to use HTML, CSS, and JavaScript to give these endpoints visual structure, presentation, and behavior.
Before we begin, we need a few imports and session variables, which we will use throughout the program.
import json
import os
import openai
app = Flask(__name__) # runs the web server
openai.api_key = os.getenv("OPENAI_API_KEY") # store API in .env file
persona = "" # Chatbot personality trait(s)
model = "" # Fine-tuned GPT-3 model to query
temperature = None # GPT-3 parameter set on chatbot home page
prev_human = "Hello." # Previous human message, starting with Hello.
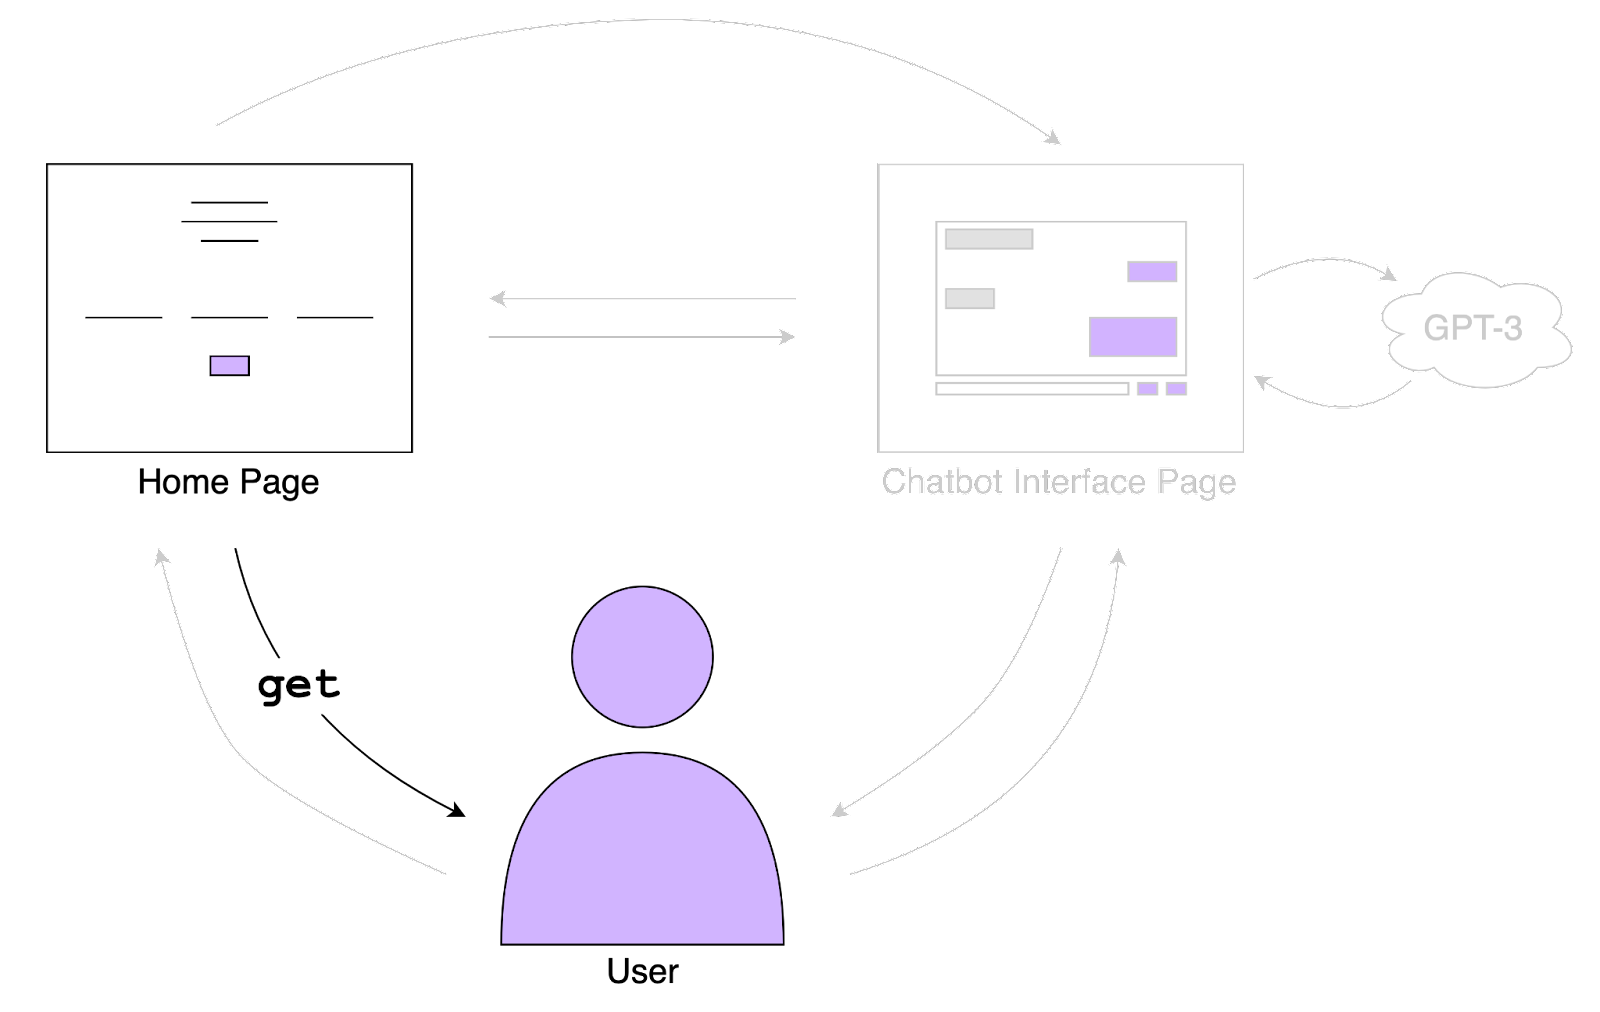
prev_bot = "Hi." # Previous AI message, starting with Hi.Now let’s start at the beginning of the user’s experience: when the user first loads the chatbot, they will send a GET request, which tells the server to render the HTML template for the home page and serve the endpoint to the user. The visual components of the home page will live in index.html, which we will take a closer look at later.
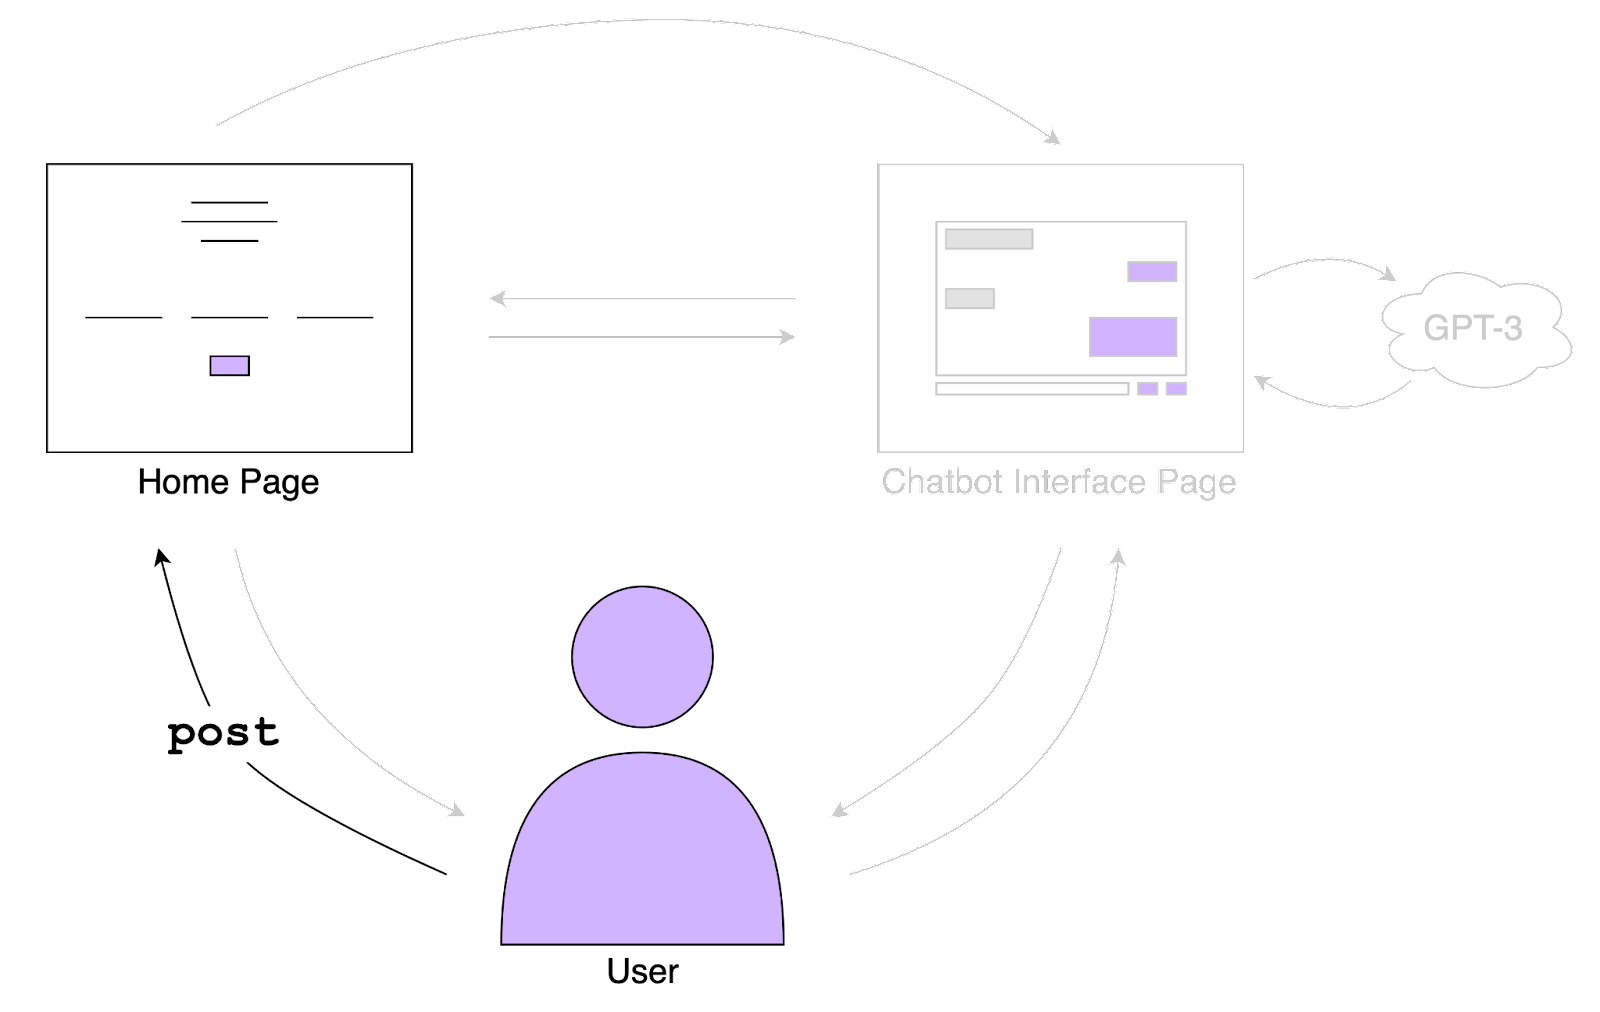
On this page, the user can submit the chatbot persona, GPT-3 model, and temperature. The persona is the chatbot’s personality, the model is the GPT-3 model that generates chatbot responses, and the temperature represents the variability of the text that the model generates. The higher the temperature, the more consistent the model generations will be. The user sends this information to the server by clicking the “Go!” button, which will trigger a POST request.
In Python, we define an endpoint with a decorator like this:
@app.route("/", methods=["GET", "POST"])
app is a Flask web server. "/" is the name of the endpoint. It is also the end of a URL. If we had a website called chatbot.com, we could access this particular page by going to www.chatbot.com/ in our browser. The methods parameter indicates that this endpoint can handle GET and POST HTTP requests.
If the endpoint is handling a GET request, all it just renders and returns the proper template:
return render_template("index.html")If the endpoint is handling a POST request, it should save the persona, model, and temperature in session variables so we can use them later and then redirect the user to the chatbot interface page. When redirecting the user to the chatbot interface page, we also want to to format the description of the persona and send it as a variable called persona_description, which we will use in the chatbot interface page endpoint and the next section.
global persona
persona = request.form["persona"]

global model
model = request.form["model"]

global temperature
temperature = float(request.form["temperature"])

return redirect(url_for(
   "chat",
   persona_description="GPT-3 Chatbot Persona: {}".format(persona)))
All together, the home page endpoint looks like this in Python:
@app.route("/", methods=["GET", "POST"])
def index():
   if request.method == "POST":
       global persona
       persona = request.form["persona"]

       global model
       model = request.form["model"]

       global temperature
       temperature = float(request.form["temperature"])

        return redirect(url_for(
           "chat",
           persona_description=f"GPT-3 Chatbot Persona: {persona}"))

   return render_template("index.html")
The chatbot interface page is another endpoint. We’ll call it /chat and its visual components will live in chatbot.html. When the home page redirects to /chat, the /chat endpoint handles a GET request by grabbing the persona_description from earlier, rendering the template, and sending the persona_description so it can be displayed on the web page.
@app.route("/chat", methods=["GET"])
def chat():
persona_description = request.args.get("persona_description")
return render_template("chatbot.html",
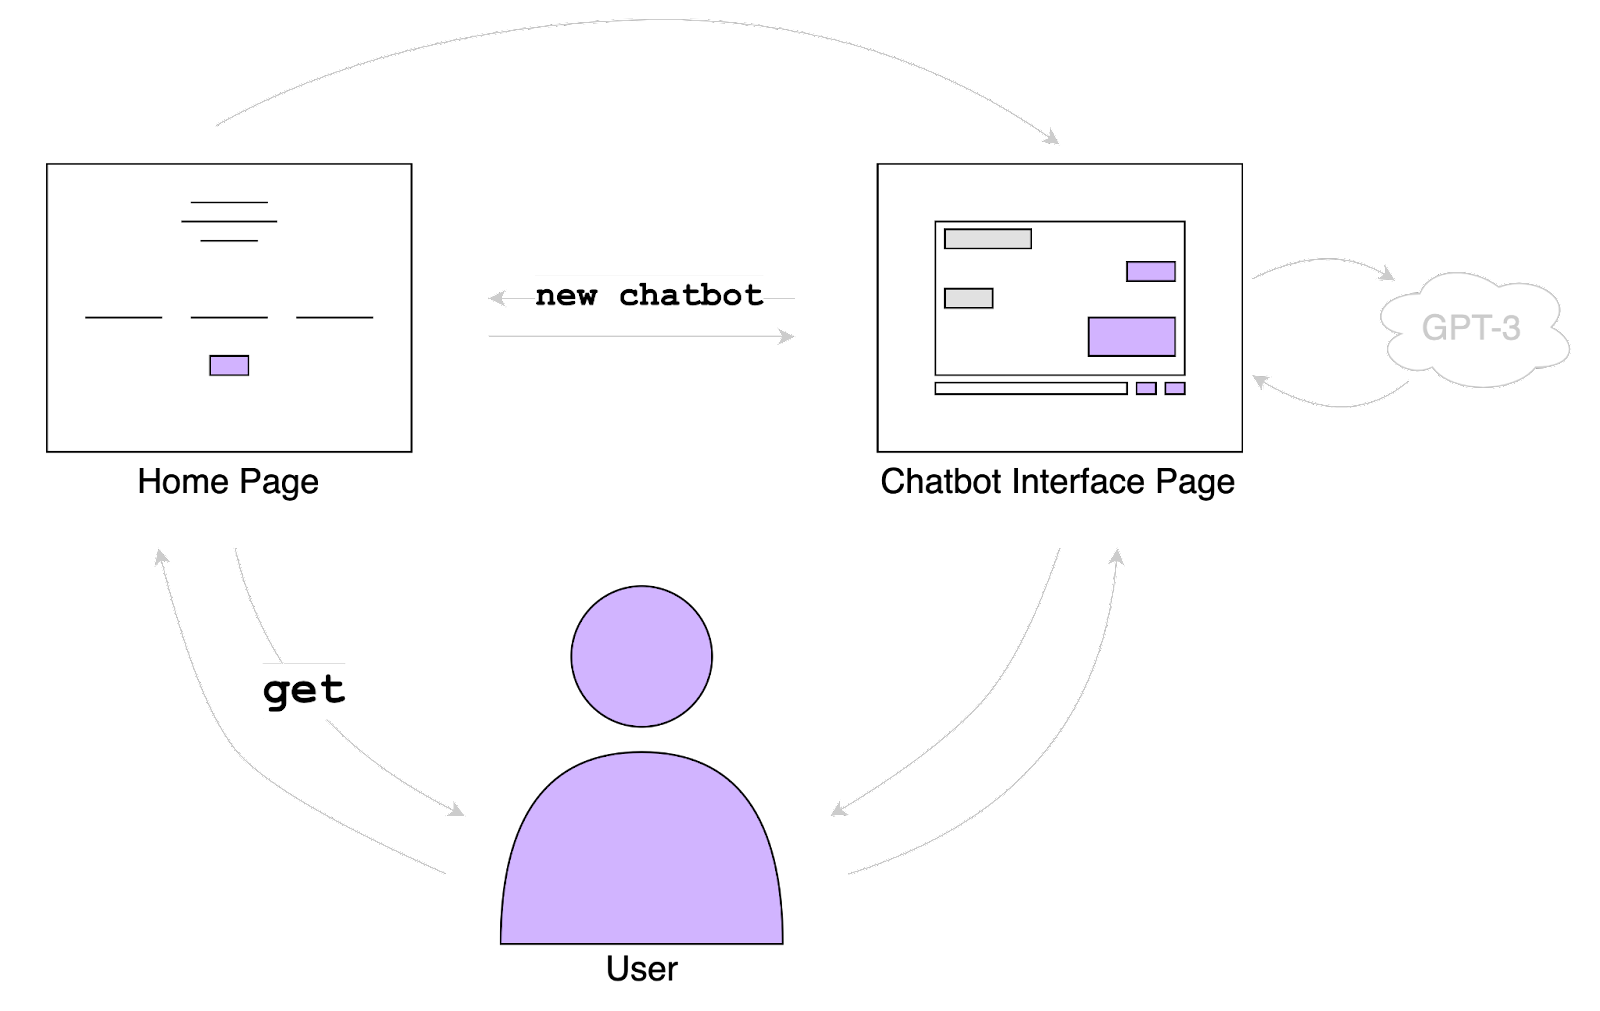
persona_description=persona_description)The chatbot interface page offers a couple of options. The user can click the “New Chatbot” button, which will send them back to the home page and trigger a GET request:
We can also send and receive messages from the chatbot, which would keep the user on the chatbot interface page. We will see how JavaScript can help us display messages on the screen later.
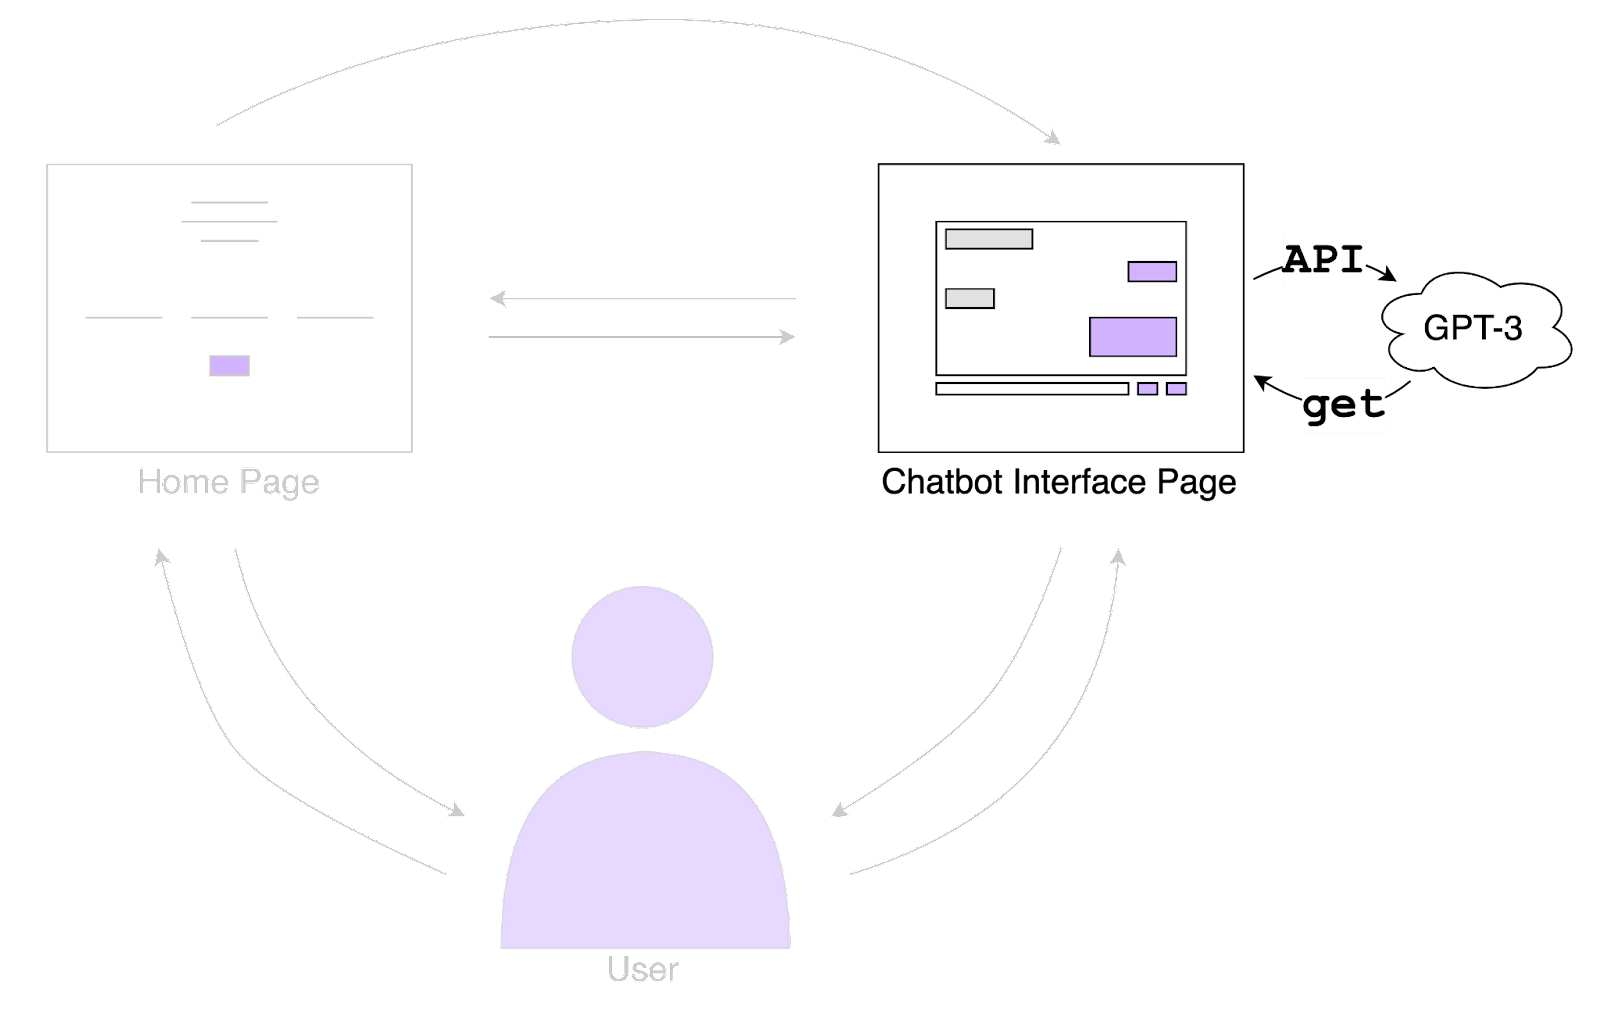
We will use the OpenAI API to send the user’s messages as input to GPT-3 and receive generations as output, which will be displayed as the chatbot’s responses. The user’s messages will be part of the prompt, which we will format like this:
This is a conversation between <persona> and human.
Human: <previous human message>
<persona>: <previous chatbot message>
Human: <current human input>
<persona>:
where the parts of the prompt in <angle brackets> are replaced by their session variable values. The final message is left blank because GPT-3 needs to complete it for us, like:
This is a conversation between Wizard and human.
Human: Hi, what is your favorite drink?
Wizard: I enjoy a nice goblet of wine.
Human: What do you do for fun?
Wizard: I cast spells.
We can make a helper function to help us format the prompt with existing session variables:
def generate_prompt(human_input):
   global persona
   global prev_human
   global prev_bot

   prompt = f"""This is a conversation between {persona} and human.

   Human: {prev_human}
   {persona}: {prev_bot}
   Human: {human_input}
   {persona}:"""

   return prompt
Then we need a way to receive the user’s message as input (human_input), give the prompt to GPT-3, and return the output as the chatbot’s response. We can do this with another endpoint!
Remember that endpoints are virtual locations—they do not have to be web pages. They can be imaginary locations that handle HTTP requests. In our case, we’ll make an imaginary location called /gpt3. The /gpt3 endpoint will receive human_input when triggered by a JavaScript call (which we will discuss later),
human_input = request.args.get("human_input")generate the prompt with our helper function,
prompt = generate_prompt(human_input)call the OpenAI API,
global model
global temperature

response = openai.Completion.create(
   engine=model,
   prompt=prompt,
   temperature=temperature,=
   max_tokens=150,
   stop=["AI:", "Human:", "\n"],
).choices[0].text
update session variables,
global prev_human
prev_human = human_input
global prev_bot
prev_bot = response
and return the response.
output = {
   "response": response,
   "success": is_successful,
}
return json.dumps(output)
We return the GPT-3 output as a JSON object containing the response string and an is_successful boolean to help us with error handling on the frontend, as we will see later. We handle errors by wrapping the OpenAI API call in a try/except statement
try:
   response = openai.Completion.create(...).choices[0].text
   is_successful = True
except Exception as e:
   response = f"ERROR: {e}"
   is_successful = False
and returning both the response string and the success flag. We can actually go one step further: the OpenAI API accepts a fine-tuned model as an engine parameter but a vanilla model as a model parameter, which makes switching between fine-tuned and vanilla models a little tricky. We can handle one edge case with an if statement
try:
   if model == "text-davinci-002":
       response = openai.Completion.create(
            engine=model, ...).choices[0].text
   else:
       response = openai.Completion.create(
            model=model, ...).choices[0].text
   is_successful = True
except Exception as e:
   ...
and let the JavaScript function that makes this GET request handle displaying the new response or error message on the chatbot interface page.
In total, the /gpt3 endpoint looks like
@app.route("/gpt3", methods=["GET"])
def get_bot_response():
   human_input = request.args.get("human_input")
   prompt = generate_prompt(human_input)

   global model
   global temperature
   try:
       if model == "text-davinci-002":
           response = openai.Completion.create(
               engine=model,
               prompt=prompt,
               temperature=temperature,
               max_tokens=150,
               stop=[f"{persona}:", "Human:", "\n"],
           ).choices[0].text
       else:
           response = openai.Completion.create(
               model=model,
               prompt=prompt,
               temperature=temperature,
               max_tokens=150,
               stop=[f"{persona}:", "Human:", "\n"],
           ).choices[0].text
       is_successful = True
   except Exception as e:
       response = f"ERROR: {e}"
       is_successful = False

   global prev_human
   prev_human = human_input
   global prev_bot
   prev_bot = response

   output = {
       "response": response,
       "success": is_successful,
   }

   return json.dumps(output)
And that is the entire backend! Now that we’ve set up our endpoints and the paths between them, we can define what they look like and how they behave.
Frontend: Building Visuals with HTML, CSS, and JavaScript
Our Python backend defines how information flows throughout the web app. HTML, CSS, and JavaScript define the visual elements of all that information on the screen. You can think of HTML as a blueprint: it sets up a hierarchical structure of where elements show up on the screen, but the elements may not look exactly how you want. CSS fixes that by allowing you to define how an element looks—also called its “presentation”—like color, position on the screen, or size. JavaScript allows you to define the behavior of these visual elements, like creating new elements, moving them around, or changing their CSS presentation. Altogether, HTML, CSS, and JavaScript define the frontend of the chatbot, the visible part of what the user interacts with.
HTML (HyperText Markup Language) has a tree-like structure called the Document Object Model (DOM) tree of nested tags that represent elements of a web page. An element is the broadest unit of an HTML document. You may have heard of <p>, <div>, <h1>, or <body>. Each of these is an element that serves a particular role. You can also customize elements by giving them classes or ids. To apply an element to some text, wrap it in a tags like this:
<p>This is a p(aragraph) element! <em>This part is italicized.</em></p>We will learn more about elements and how to use them in examples throughout this section.
Each web page is defined in its own HTML template, which is typically a file with the .html extension. Notice that “template” is sort of another word for “blueprint”—we use HTML templates to set the foundation of each web page and then fill in more details with CSS and JavaScript. Each HTML template starts with a <!DOCTYPE html> declaration and <head> element, where we can set the title of the web page and include scripts, links, or other metadata. For example, the <head> element of the chatbot interface page sets the title to “GPT-3 Chatbot,” links the CSS stylesheet, and imports the JQuery library. We will talk more about stylesheets and JQuery a little bit later.
<head>
   <title>GPT-3 Chatbot</title>
   <link rel="stylesheet" href="/static/main.css" />
   <script src="https://ajax.googleapis.com/ajax/libs/jquery/3.2.1/jquery.min.js"></script>
</head>
Home Page
Let’s start with the home page, which lives in index.html and is served by the index() Python function. This is what it looks like before applying CSS formatting.

It has a headline that announces the name of the web app, “Chatting with a GPT-3 Persona.” HTML has elements from <h1> (biggest) to <h6> (smallest) that format text to be a different size. This is helpful for creating headings and subheadings in written documents. We will use the <h1> element for this line of text. We then have a short paragraph introducing the chatbot, which we will wrap with a <p> element.
<h1>Chatting with a GPT-3 Persona</h1>
<p>Chat with GPT-3! Choose a persona to begin. Personas can be adjectives, like happy or sad, or characters, like wizard or doctor. You can also specify an OpenAI model and temperature or just use the defaults provided.</p>
We can customize the presentation of these elements with CSS like this:
h1 {
   font-family: "Courier New";
}
p {
   font-family: "Helvetica";
}
CSS works by using “selectors” to update the values of presentation parameters. In this case, the h1 is a selector for the header 1 element. We have set the font family to be Courier New. The p is a selector for the paragraph element, and it is setting the font family of all paragraphs to Helvetica. We can apply this set of CSS formatting rules by including them in a .css file adding a <link> to the file proper HTML template, like
<head>
    ...
    <link rel="stylesheet" href="/static/main.css" />
    ...
</head>
Here’s what the text of our web page looks like before linking main.css

and after:

The text input fields are all made the same way: we use an <input> element of type text. The <input> element has a name (that Python uses to access the input data), placeholder (a short hint displayed inside the text box before the user types anything), and value (default data) that we can use to improve the discoverability of the interface.
<input type="text" name="persona" placeholder="Give the chatbot a persona"
    required autocomplete="off" />
<input type="text" name="model" placeholder="OpenAI Model"
    value="davinci:ft-ccb-lab-members-2022-03-07-17-25-36" />
<input type="text" name="temperature" placeholder="Temperature"
    value="0.9" />
We also wrap the input with a <label> element, which allows us to label and give titles to elements. The “free-hanging” text (“Temperature” in the example below) will appear next to the element it is labeling.
<label title="Amount of variability in GPT-3 outputs">
   Temperature
   <input type="text" name="temperature" … />
</label>
The “Go!” button is also an <input> element, this time with the type submit. We also wrap it with a <label> element. We do not use free-hanging text to label the button because the “Go!” value of the <input> already acts as a label. Beyond giving visual titles to elements on a screen, <label> elements help widen access and support screen readers. This is ability-based design in practice!
<label title="Submit button" class="go-button">
   <input type="submit" value="Go!" class="go-button" />
</label>
Lastly, we wrap all of these inputs, including the button, with a <form> element. The action attribute of the form will determine where the input data goes. In our case, the input data goes to the "/" endpoint, which represents our home page. This is how we “send” data to the index() Python function so we can use it in the backend.
<form action="/" method="POST">
   <label title="A persona for the GPT-3 Chatbot">
       Persona
       <input type="text" name="persona" … />
   </label>
   <label title="The OpenAI model to prompt with">
       OpenAI Model
       <input type="text" name="model" … />
   </label>
   <label title="Amount of variability in GPT-3 outputs">
       Temperature
       <input type="text" name="temperature" … />
   </label>
   <label title="Submit button" class="go-button">
       <input type="submit" value="Go!" class="go-button" />
   </label>
</form>
All together, the HTML template for the home page looks like
<!DOCTYPE html>

<head>
   <title>GPT-3 Chatbot</title>
   <link rel="stylesheet" href="/static/main.css" />
</head>

<body>
   <div class="intro">
       <h1>Chatting with a GPT-3 Persona</h1>
       <p>Chat with GPT-3! Choose a persona to begin. Personas can be adjectives, like happy or sad, or characters, like wizard or doctor. You can also specify an OpenAI model and temperature or just use the defaults provided.</p>
       <form action="/" method="POST">
            <label title="A persona for the GPT-3 Chatbot">
               Persona
               <input type="text" name="persona" placeholder="Give the chatbot a persona" required
                   autocomplete="off" />
           </label>
           <label title="The OpenAI model to prompt with">
               OpenAI Model
               <input type="text" name="model" placeholder="OpenAI Model"
                   value="davinci:ft-ccb-lab-members-2022-03-07-17-25-36" />
           </label>
           <label title="Amount of variability in GPT-3 outputs">
               Temperature
               <input type="text" name="temperature" placeholder="Temperature" value="0.9" />
           </label>
           <label title="Submit button" class="go-button">
               <input type="submit" value="Go!" class="go-button" />
           </label>
       </form>
   </div>
</body>
Chatbot Interface Page
The chatbot interface page lives in chatbot.html and is served by the chat() Python function. It uses several of the same elements as index.html, like <h1>, <p>, <form>, and <input>, so we will skip those. Let’s take a closer look at the chatbot interface page before CSS formatting.
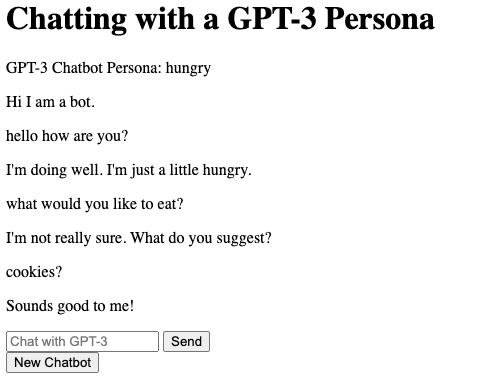
First things first: the persona. The persona represents the personality of the GPT-3 chatbot, which the user originally submitted in the persona input field on the home page. When the backend redirects the user to the chatbot interface page, it passes persona_description along and displays it.
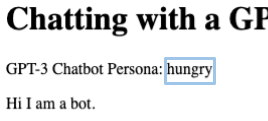
The persona_description variable is a piece of data given by the web server, and we access it in chatbot.html with an if-guard for safety like this:
{% if persona_description %}
   <div> {{ persona_description }} </div>
{% endif %}
The main component of the chatbot interface page is the chat interface right in the middle of the page. We have the user-entry-area, which is the section at the bottom where the user can type into the text box, send messages, and create a new chatbot (these are all <input>s, <form>s, and <label>s again). Right above that is the chat-window, where the message bubbles will be displayed. The chat-window and user-entry-area together make up the chat-area.
How do we section off all these windows and areas and message bubbles? <div>s! The <div> element is a division of a document—we can use it as a generic container for other elements. We can also customize <div>s with CSS by using class and id attributes. These two attributes are similar to each other. They work as identifiers for different categories of HTML elements. The main difference is that id is supposed to be unique (it is not actually enforced) while class is not. We can access elements with different levels of granularity using class and id. Take our message bubbles, for example:
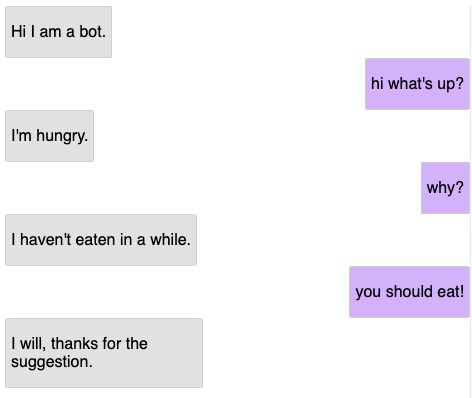
All message bubbles have several attributes in common (like the gray border and slightly rounded corners) but the GPT-3 messages are gray and left-aligned while the human messages are purple and right-aligned. We can assign a “bot” or “human” HTML class attribute to categorize these message bubbles and use CSS to customize the appearance.
<div class="bot">
    <p>Hi I am a bot.</p>
</div>
<div class="human">
   <p>Hi I am a human.</p>
</div>
Selectors for classes have a dot in front and selectors for ids have a pound sign in front. You can select for multiple selectors at once by separating them with a comma. When separating selectors with a comma, the same styles will be applied to elements of either type. We can apply some styles to both bot and human message bubbles…
.bot, .human {
    border: 1px #ccc solid;
    height: auto;
    min-width: 2.5%;
    max-width: 40%;
    border-radius: 3%;
}
and some styles to only bot or only human message bubbles.
.bot {
   float: left;
   background-color: #e1e1e1;
}
.human {
   left: 0;
   right: 100;
   float: right;
   text-align: right;
   background-color: #d3b2ff;
}
Back to plain HTML! So far, the set up for chat-area, user-entry-area, and chat-entry are the same from the home page section.
<div class="chat-area">
    <div class="chat-window" id="chatbox">
        <div class="bot">
            <p>Hi I am a bot.</p>
       </div>
   </div>

   <div class="user-entry-area">
       <form action="/chat" method="POST" id="userInput"
                class="chat-entry">
           <label title="Text input for the user's message to the GPT-3
                    persona" id="textLabel">
               <input type="text" name="human_input" id="textInput"
                    placeholder="Chat with GPT-3" required
                    autocomplete="off" />
           </label>
           <label title="Send button">
               <input type="submit" value="Send" id="send" />
           </label>
       </form>
        <form action="/" method="GET" class="chat-entry">
            <label title="New chatbot button">
                <input type="submit" value="New Chatbot" id="new-chatbot" />
            </label>
        </form>
   </div>
</div>
How do we add new messages to the chat-window? JavaScript! The JQuery library can help us manipulate the DOM tree, allowing us to dynamically add new elements to the page. First, we add event listeners to detect when the user presses the return key on their keyboard or clicks the “Send” button.
$("#textInput").keypress(function (e) {
   if (e.which == 13 && $("#textInput").val().length > 0) {

        getResponse();
   }
});

$("#send").click(function () {
   if ($("#textInput").val().length > 0) {
       getResponse();
   }
});
When a user sends a message, we will format the message into a message bubble,
let userText = $("#textInput").val();
let userHTML = '<div class="human"><p>' + userText + '</p></div>';
reset the user input element,
$("#textInput").val("");
and add the message bubble to the chat-window (which has the id “chatbox”).
$("#chatbox").append(userHTML);
We will then use the JQuery $.get() function to get the result of the /gpt3 endpoint. When the $.get() function is done processing, it will call an anonymous function with a parameter called botReplyJSON.
$.get("/get", { human_input: userText }).done(function (botReplyJSON) {
   ...
}
This anonymous function will capture the return value of the $.get() function, which is the return value of the get_bot_reply() Python function, as its parameter. This return value is the JSON output variable in get_bot_reply(), which you can read more about in the backend section. The main idea is that this function will get and format the GPT-3 output as a bot message bubble.
The anonymous function will parse the JSON object,
var output = JSON.parse(botReplyJSON);
format the bot response,
var botReply = output.response;
var botHTML = document.createElement("div")
botHTML.className = "bot";
var p = document.createElement("p");
p.innerHTML = botReply;
botHTML.append(p);
change the color of the message bubble to yellow if response was not successful,
if (!output.success) {
   botHTML.style.backgroundColor = "yellow";
}
and append the new message bubble to the end of the chatbox.
$("#chatbox").append(botHTML);
It will end by scrolling the chatbox so the most recent messages always appear at the bottom.
var chatbox = document.getElementById('chatbox');
chatbox.scrollTop = chatbox.scrollHeight;
All of this is wrapped in a function called getResponse(), which is called whenever the return key is pressed or the send button is clicked (and the message is not empty).
The getResponse() function and keypress() and click() event handlers are included in chatbot.html in the <script> element. We could have put the JavaScript functions in a different file, which is usually the best practice. Since the functions were relatively short and to demonstrate that it can be done, I decided to include it as a <script> in the HTML file.
<script>
    function getResponse() {
        let userText = $("#textInput").val();
        let userHTML = '<div class="human"><p>' + userText + '</p></div>';
        $("#textInput").val("");
        $("#chatbox").append(userHTML);
        $.get("/get", { human_input: userText }).done(
            function (botReplyJSON) {
                var output = JSON.parse(botReplyJSON);
                var botReply = output.response;
                var botHTML = document.createElement("div")
                botHTML.className = "bot";
                var p = document.createElement("p");
                p.innerHTML = botReply;
                botHTML.append(p);

                if (!output.success) {
                    botHTML.style.backgroundColor = "yellow";
                }

                $("#chatbox").append(botHTML);

                var chatbox = document.getElementById('chatbox');
                chatbox.scrollTop = chatbox.scrollHeight;
            }
        )
    }

    $("#textInput").keypress(function (e) {
        if (e.which == 13 && $("#textInput").val().length > 0) {
            getResponse();
        }
    });

    $("#send").click(function () {
        if ($("#textInput").val().length > 0) {
            getResponse();
        }
    });
</script>
| < Back to Part 1: Understanding GPT-3 | Next to Part 3: Critiquing Our Design > |